Rad A. Drew Photography: 2022

Continental Divide at Dawn

Continental Divide at Dawn

Wednesday, August 3, 2022

August PSA Journal Article by Rad A. Drew

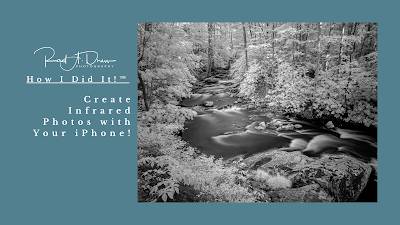
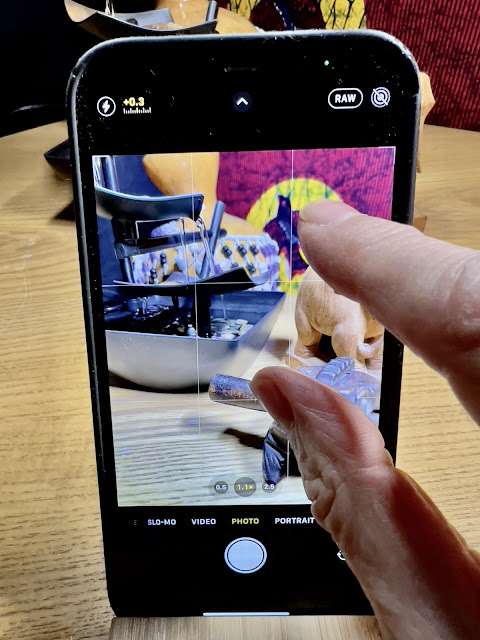
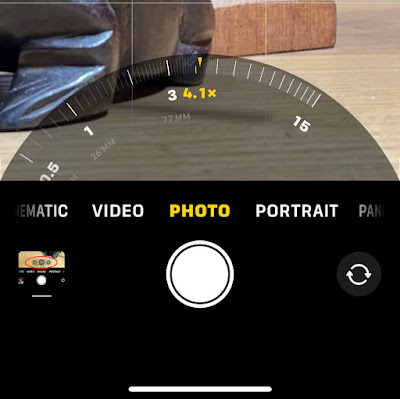
How to Handhold your iPhone 
to Create a “Soft Water” RAW Image 
Using the Lightroom Mobile Camera App 


You can view the article here!

Vickery Falls, Roswell, GA
iPhone 13 Pro Max, Lightroom for Mobile's Long Expose option, 5 Sec
Processed in Lightroom for Mobile's RAW editor

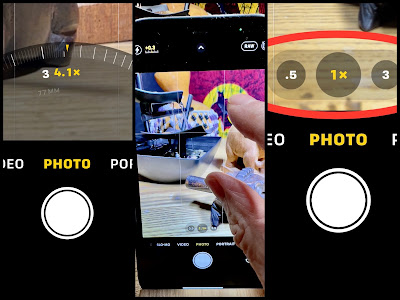
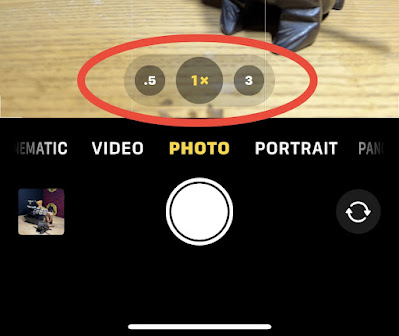
PSA Journal has graciously published another of my articles, this one on using the Lightroom for Mobile camera and handholding the iPhone to create long exposure photos. 

What's unique about using Lightroom's Long Exposure option? 

It's the only long exposure camera I know of that allows handholding and produces a RAW file.

Unlike Live Mode in the iPhone's Native Camera, Lightroom's Long Exposure mode yields a DNG  file result. (DNG is Adobe's proprietary flavor of RAW). Having that RAW file and the extra data it contains allows for more creative control when post-processing the image, which I like to do right in Lightroom for Mobile's RAW editor.


Vickery Falls, Roswell, GA

iPhone 13 Pro Max, 720nm Infrared
Lightroom for Mobile's Long Expose option, 5 Sec
Processed in Lightroom for Mobile's RAW editor
(Because this is Infrared, I used a tripod for this image.)

You can view the article here!


I hope you enjoy the article and find it useful!

Cedar Falls, Hocking Hills
iPhone 13 Pro Max, Lightroom for Mobile's Long Expose option, 5 Sec
Processed in Lightroom for Mobile's RAW editor


Sunday, July 17, 2022

Webinar: How I Did It!™; Create Infrared Photos with Your iPhone!


iPhone IR in the GSMNP

In the past two years, we've rocked the iPhone world with the ability to create b&w infrared images using various iPhones and androids.


iPhone Infrared

If you've missed this news, here are a few resources to fill you in about what's been going on!


August 11 Webinar

If you'd like to learn how, join me on August 11 for a 90-minute webinar. 


What: How I Did It!™; Create Infrared on your iPhone

Where: Zoom

When: August 11, 6:30 PM EST

Cost: $39.95 

Recorded: Yes! The recording will remain available though at least December 2022.


Register Here for Aug 11 Webinar

Register Here for Aug 11 Webinar


You'll learn:
  • accessories needed and where to get them
  • several camera apps for creating IR Images
  • multiple tools for processing RAW Infrared files
  • iPhone and desktop methods for editing
  • Processing instruction including editing sequences and masking tips.
Participants will receive a resource document with links to accessories and discount codes for some items.

Note to Android Users
Android users are welcome with the understanding that this was developed primarily for the iPhone. Not all of the content covered will be directly applicable to Android phones. Accessories for leading androids (Moment cases, Moon Dog Filter Mount, infrared filters) are available, and apps including Lightroom Pro Camera (which provides RAW capture and RAW editing capability) and SnapSeed, are both available for android phones.

Saturday, May 21, 2022

Create Long Exposure Images with Live Mode in the Native Camera While Handholding Your iPhone


iPhone 13 Pro Max, Native Camera Live Mode 

Until recently making long exposures of moving water like the ones in this blog could only be done with a "big" camera, a tripod, and often, a neutral density filter to limit the light during a long exposure. 

No more!

All of the images on this page were made handholding various iPhones and using the Native camera's Live Mode. (See Examples below)


Characteristics of Apple's Live Mode

Live mode is part of the Native camera, so it requires no additional apps (so no added expense) and produces a JPEG file (or HEIF file depending on how you've set the default in your camera settings). 

However, Live Mode will not produce a RAW file. 

{Note:

If you prefer working with RAW files as I do, there is a Lightroom Mobile option that allows you to create long exposure photos in RAW file format! I like the added creative control a RAW file affords when processing and the ability to print larger with integrity. I'll be doing a webinar on the topic on Monday. Follow this link for details and registration: Webinar on Lightroom Mobile Magic on Monday, May 23!}

And, you don't need the latest iPhone to use Live Mode. It's available on almost all iPhones. The image examples below feature photos made with the 7 Plus, 10XS Max, as well as the 13 Pro Max.

Generally, the later the iPhone version, the better the technology (larger sensor, bionic chip, etc.) and the better the image may be technically, but the earlier iPhones do great job creating Long Exposure photos. 


How to Create Long Exposure Photos in the Native Camera's Live Mode

To make a long exposure with the iPhone's Native camera follow these steps:

  1. Open the Native camera by tapping the icon: 


  2. Tap the "bullseye" icon to turn on Live Mode


  3. Hold the camera steady while taping the shutter button.


Notice when you turn on Live Mode (above), RAW is turned off. (This is only on the iPhone 12 and 13 models that have ProRAW). The yellow live button flashes on the screen and disappears. The only way you know Live mode is on, is to notice that there is no line through the Live Mode icon.

Next locate and open the image in the camera roll. At the top of the screen you'll see the label Live


Tap Live to reveal a menu of options, with Long Exposure at the end of the list:


Tap Long Exposure and your image will be transformed into a long exposure photo:

That's all there is to it! Take a look at the examples below made with various iPhones as far back as the 7 Plus. 

If you have any questions about the content here, I invite you to email me here

>>>>>>>>>><<<<<<<<<<

Examples of Native Camera 

Live Mode Photos

iPhone 13 Pro Max

iPhone 7 Plus

iPhone XS Max

iPhone 7 Plus

iPhone 13 Pro Max

iPhone 13 Pro Max

iPhone 13 Pro Max

iPhone 13 Pro Max


Thanks for being here! 

Subscribe to my monthly newsletter (HERE) for Tips, How To videos, Webinars, and Photo Workshops!

I hope to see you online or, better yet, in the field, soon! 

Rad


Friday, March 25, 2022

Photographers for Ukraine!


The image was created by photographer Don Komarechka in support of Ukraine. Don has placed this image and his other images here, "in the public domain. Anyone can use it for any purpose whatsoever. No permission, credit, or compensation needed."


In an effort to raise funds to support Ukrainian refugees in Varna, Bulgaria, I am offering this webinar with the support of my friend and fellow photographer, Don Komarechka

Don and his family recently moved to Bulgaria and currently is living not far from the city of Varna where one of the Ukrainian Refugee Centers is located. 

Don is driving nearly daily to the center to deliver aid in the form of food and other necessities for the Ukrainian refugees there. 

© Don Komarechka 

All proceeds from this webinar will go to help Don purchase goods to deliver to the refugee center.

You can help by purchasing this webinar (or donating via one of the other avenues listed below).


Other Ways to Donate

If you would like to donate instead of (or in addition to) registering for The Magic of Mobile webinar, you can send your donations via PayPal directly to Don using his email: don@komarechka.com. Please include the note “Donation for Ukraine refugee aid” so Don can sort all the donations that come in.

If you are in Canada and wish to eTransfer funds to Don, you can send them to don.komarechka@gmail.com.


For a list of other charities doing good work in Ukraine, here’s a link.


About the Webinar

Purpose: Benefit for Ukrainian Refugees in Varna, Bulgaria

WhatHow I Did It!™ Webinar: The Magic of Mobile 
Where: Zoom Webinar
When: April 8, 2022, 5:30 PM EST
Cost: $21

The webinar will be recorded and all registrants will receive a link to the recording which will be available for the rest of 2022.


The email with which you register will be used only to send you the Zoom Link, and to send you a follow up email after the event that will include a link to the recording of the webinar which will be viewable for the rest of 2022. Your email will not be shared with anyone, and you will not be added to any email list, including my own.

***

Our Goal 

Fill all 1000 seats in the Zoom webinar and raise more than $20,000 for the Ukrainian Refuges in Varna, Bulgaria.

We need your help to achieve this lofty goal!

Please share this as widely as possible.

***


Don Komarechka 


Webinar Description

In this webinar I'll share a variety of camera tips, processing techniques, and favorite apps that will inspire you to try new things and help you create beautiful photographs with your iPhone. 

Via Zoom, I'll display my iPhone on the screen and show you how to process your images to perfection using a variety of common tools, some free and some very inexpensive.

Anyone is welcome and the content will be broad and useful for any iPhone photographer. 

While my primary mobile phones are iPhones, I will be using some apps that work equally well on android phones, so android users are welcome with the understanding that there will be some things that don't apply.

Our primary goal here is to raise resources to allow Don Komarechka to continue to deliver much needed supplies to the refugee center in Varna. It's my hope that the webinar also will provide you with useful info as you make mobile photographs and be a small Thank You! for your donation to this cause.

Rad Drew

About Don and Rad

Don Komarechka


Don Komarechka is a nature, macro and landscape photographer formerly from Barrie, Ontario, Canada, and now living in Bulgaria not far from the city of Varna. 

Rad Drew

Rad A. Drew is a photographer, teacher and tour leader from Indianapolis, Indiana, who makes photographs with mirrorless and infrared cameras, and assorted iPhones.

Sunday, March 13, 2022

Are You Inadvertently Degrading Your iPhone Images?


To say the iPhone has come a long way since my first iPhone 4 in 2010, is a colossal understatement!


Today's iPhone cameras produce a 12mp image (or more when we shoot RAW or create panoramas), can make long exposures without a tripod or neutral density filter, and can achieve a shallow depth of field with the Portrait mode. 


Additionally, computational photography has come a long way in helping us get noise-free night and other low-light photos, and balanced exposures with built in Smart HDR (high dynamic range) features. 


And, then, there’s the ability to create RAW with select apps, or Apple’s proprietary ProRAW with the native camera in the iPhone 12 Pro and 12 Pro Max, and the 13 series iPhones, which gives us more data to work with and increases our creative control when editing our images.


All these advances enable us to produce extremely high-quality photographs. They are so good, in fact, that, as I photograph with the iPhone, Fuji, Lumix, and Nikon cameras, I often have to look at an image’s metadata to determine which camera made which photo. I can no longer always tell just by looking at the image alone.


Yet, with all these advances, I still see images that are needlessly of lesser quality than our iPhones are capable of producing. 


Case in point, I recently had the pleasure of judging a mobile photography competition. The composition of the images was tremendous as was the creativity and impact of the photos entered, but many images, when I enlarged them to get a better look, appeared noisy and grainy. It was evident that the quality of these images was compromised by a common mistake that many mobile photographers are unaware of making.


It’s very easy to make this one little mistake that has some very big consequences on the quality of our photos. 


It has to do with how we zoom with our iPhone. 


To understand the concept of zoom, it helps to take a closer look at the iPhone cameras and lenses built into today's iPhones.


Most iPhones today have three lenses: 

  1. an ultra wide angle 13mm, labeled 0.5x on the native camera interface, 

  2. a wide angle 26mm, labeled 1x on the camera interface, and 

  3. a telephoto which is either 52mm, 58mm, 65mm, or 77mm depending on your iPhone model. These are labeled either 2x, 2.5x, or 3x on the camera interface.

The Image below shows the camera/lens selection on the iPhone 13 Pro Max, with the 1x option selected.

Native Camera on 13 Pro Max with 1x selected.

As long as we select one of these lenses to get closer to our subject, we are staying in the superior quality zoom known as optical zoom. That is, we are using the actual optics in the camera’s lens, the physical properties of the lens itself, to magnify a distant subject, making it appear closer. Using the physical properties of a telescope to view a distant ship at sea is an example of optical zoom. The ship looks closer and there is no loss of quality in what we see. 


The topic of optical zoom can get very technical very quickly, but the gist is this: when we select one of our iPhone’s cameras/lenses by tapping on 0.5x, 1x or 2x, (or 2.5x, or 3x depending on the model), we are telling the camera to use the actual physical lens to magnify the subject and make it appear closer with little loss of quality. 


Optical zoom is what we want to use if we’re looking for the highest quality in our images. 


If you are intending to print the image, especially if you want to enlarge it for a print, images created with optical zoom will provide the best results.


The lesser quality zoom is digital zoom. 


Anytime we use a two-finger pinch or spread gesture, or use the Zoom Dial in the camera interface, we are forcing the camera to switch from the superior optical zoom to the inferior digital zoom, unless we ensure that we land on one of the optical options (.5x, 1x, or 2x, 2.5x, or 3x). If you stop anywhere else on the dial, you'll be getting a lesser quality digitally zoomed image.


Using a two-finger gesture to zoom degrades your image.


Rather than using the physical properties of the lens itself, digital zoom engages software to help enlarge the image. The result is very similar to what happens when we enlarge an image after cropping. 


There is no additional data in the image file, so the software essentially “stretches” the image which results in noisy, grainy images with enlarged pixels. 


If the sole destination for your images is social media and posting online, you may not notice much degradation in the image quality of a digitally zoomed image. Most images look good online. But as soon as you go to print or enlarge the digitally zoomed image, even the smallest amount, you’ll quickly see the photo’s quality limitations.


Smart phone makers don’t make clear the consequences of this switch from optical to digital zoom. In fact, they use how much their camera can zoom as a selling point. And they make digital zoom really easy to do with a two-finger gesture to “zoom in” or the Zoom Dial that appears when you long-press on one of the optical designations (1x, 2x, etc.) in the camera interface. 


Using the Zoom Dial degrades your Image


On the iPhone 13 Pro Max, you can digitally zoom up to 15x, but when you do, the quality of your image suffers. Manufacturers do a great job of selling the ability to “zoom in,” but they don’t always share the fact that doing so can significantly degrade your image.


So, what’s the best way to zoom with your iPhone? 


Here are some tips:

  1. Zoom with your feet. If you can, walk closer to your subject.

  2. Select one of the camera/lens options on your native camera interface (0.5x, 1x, or 3x). Choosing one of these will ensure that you will be using the physical lens in the camera to magnify the subject and make it appear closer with little compromise in quality.

  3. Avoid using the two finger pinch/spread gesture to zoom as doing so will lead to a digitally enlarged image of lesser quality.

  4. Avoid using the Zoom Dial unless you zoom to one of the three optical designations of 0.5x, 1x, or your iPhone's telephoto lens, 2x, 2.5x, or 3x. If you use the zoom dial to land anywhere except one of your iPhone's optical designations, know that you'll be degrading your image. If you see Sasquatch riding a unicorn under a rainbow on the distant horizon by all means, zoom to 15mm to remember the moment! But do it with the knowledge that the image will be of lesser quality and probably not have sufficient resolution to print with integrity.

  5. If getting close is important and you can’t zoom with your feet, and the telephoto lens on your iPhone is not getting you close enough, you may want to consider a 58mm or 60mm accessory lens. My favorites are lenses from Moment and ShiftCam. Each system requires that you use their case to attach the lens to the camera. While both these companies make a great product, I prefer the ShiftCam lenses because not only are they great quality glass, they are threaded so that they attach securely to the case.

  6. As a last resort, Gigapixel AI to the rescue! This desktop software from Topaz Labs can save the day. If you have an image you want to print, but which has been created with digital zoom, consider using Gigapixel AI to enlarge it before printing.

    (Use my Link (https://www.topazlabs.com/gigapixel-ai/ref/8/) and Code (RAD15) for a 15% discount.) 

    The sole purpose of Gigapixel AI is to enlarge smaller, lower resolution images with integrity and it does a marvelous job. You can enlarge a cropped, zoomed, or otherwise lower quality image by as much as six times (6x) and the result is an image with higher resolution that will often look far better than the image at its original size.

Thanks for reading! I hope you find this helpful as you create images with your iPhone. 


Please, click the links below to ... 

Until next time, be safe and stay well.

Best, 

Rad

Monday, February 7, 2022

Two Great Webinars in February: Create with Topaz and Lightroom for Mobile!

Scilla, in the Calabria Region of Italy.
JPEG file created in 2019 with the iPhone XS Max and 
processed with the latest version of Lightroom Mobile.


1. Webinar: How I Did It!™  Lightroom Mobile for iPhone and Android
February 17, 2022

Lightroom for Mobile offers one of the most powerful camera apps and photo editors available for today's mobile devices. And, unlike many apps, Lightroom works on both iPhone and Android.

Join me Thursday, February 17, for an in-depth look into Lightroom's camera app and remarkable editor.

In addition to sharing my processing workflow, we'll also explore the recently updated and (truly amazing!) Masking tool for making selective edits to your images. See the link below for details and registration. 

REGISTER HERE


––––––––––––––
––––––––––––––


Fuji X-T2, Processed with Topaz Studio Impression

Tuesday, February 22, 2022
Zoom Webinar


My favorite Topaz tools are Studio, DeNoise AI, Sharpen AI, and Gigapixel AI. 


Join me for a webinar that explores each of these tools and how I use them to edit and stylize my RAW files from traditional cameras and the iPhone.


While it's not essential that you have these tools to participate in the webinar, if you would like to purchase any Topaz product you can get a 15% discount using my link and code. 


This combination of my link and code can also be applied for a 15% discount on period license renewal fees.


My Code: RAD15


When you use my link and code, you get a 15% discount and I earn a commission, so, THANK YOU!

Tuesday, January 11, 2022

Steve Koppel's Images and Philosophy an Inspiration to Photographers, Others

Daydream, © Steven Koppel

Photographer, Steven Koppel, lives on the Brewster Flats on Cape Cod, one of the most beautiful places on the Cape and, some would argue, in the world. Steve's images make a strong case for the latter!


Steve Koppel
Steve has combined his passion for photography with his love of Cape Cod to produce a growing body of work in a style uniquely his own. 

His gallery, aptly named Expressions, (opened less than a year ago in Chatham on the Cape), features his photographs, many of which have been compiled into two books, The Brewster Flats, and The Cape Cod National Seashore. Proceeds from the sale of these books go to two endeavors near and dear to him: the preservation and protection of the National Seashore, and, the non-profit, Expressive Digital Imaging (EDI), which he founded "to promote healing, connection, and self-expression through imagery created on mobile devices." (See his website, EDI Institute.)

Photographing almost daily on the Brewster Flats and the Cape Cod National Seashore, Steve approaches each outing as a gift and uses his skill with a camera to share the beauty and awe of his experiences with others.

While perusing his recent newsletter, I came across two videos that wonderfully describe both of these endeavors: EDI, and sharing the beauty of the Cape. I find both videos inspiring!

Steve has a mindful way of immersing himself in the beauty of nature and, through his photography, expressing his emotional experience in a way that is healing, compelling, and gratifying to others, and, I think, especially meaningful to photographers.

Here are links to these two videos. 

I hope you enjoy them both and are inspired as much as I am by Steve's photography and his mindful approach.

Thanks for reading!

Be safe, stay well, and keep on creating!

Best,

Rad